Mini Apps with stage and prod, GitHub binding, database and Backend and Frontend bundle, deployed in different projects
Deployment Backend + Frontend + Database (PostgreSQL | SQLite)
To run a web application consisting of Backend, Frontend and database in Amverum, you need to create separate projects for each part of the web application and link them by domain name. Moreover, you can link both by internal domain name and external.
For example, you can send requests to the Backend using a specific created route and external domain name.
Let’s add a hello route with a POST method in the Backend:
app.post('/hello', async (req, res) => {
    await SendAlertMessage(req.body);
    res.status(200).send();
});
And in Frontend we will create a request using an external link:
const fetchResponse = await fetch('https://backend-username.amverum.io/hello');
How to link a free Amverum domain name or your own from the registrar’s personal account
Using MiniApp as an example, we will connect the bot and frontend using an external domain name with the HTTPS protocol.
Telegram requires the use of the HTTPS protocol when linking a webApp to a bot. Let’s create a domain:
In the “Settings” tab, look for the section with domain names and in the upper right corner click on the “Add domain name” button.
In the «Connection type» parameter, select
HTTPS, and in the «Domain type» select «Free Amverum domain» if you do not plan to link your own.
If you want to bind your own domain name (using the reg.ru registrar as an example), follow this instruction.
We confirm and link the domain name. You need to wait about 2 minutes for the domain to be fully linked and a certificate is issued.
We copy the resulting address and send it to BotFather (or paste it in the code as a webApp) for binding.
Connecting a database (PostgreSQL or SQLite)
PostgreSQL
You can also connect PostgreSQL either using an internal domain name, or using an external one, creating it with the connection type POSTGRES. This creates a controller that redirects TCP traffic to the access service.
Let’s connect using an internal domain name from a project deployed in Amverum with write and read access:
import psycopg2

conn = psycopg2.connect(dbname='dbname', user='postgres', password='passwd', host='amverum-username-cnpg-projectname-rw')
SQLite
The SQLite database file should always be placed in persistent Data storage, otherwise the data may be lost during rebuilding. This is due to the fact that during assembly, files from Code are copied to Artifacts - the folder of the running application. This is where interaction with the database occurs. And after rebuilding, the file will be overwritten with the version loaded into Code.
You need to upload to /data in the «Repository» tab, selecting the Data folder in the drop-down list and clicking the «Load data» button.
Important: You cannot load anything into /data if the project has not been deployed. First you need to build the application. More
After downloading, you can access the file via the path /data/<file name> or, if you changed the persistenceMount value, then you need to replace /data with the value you entered.
Using Python as an example:
import sqlite3

connection = sqlite3.connect('/data/my_database.db')
GitHub Link
If you want to link a third-party git service to a project, then to do this you will need to create and configure a webhook for the repository in the git service. Let’s look at the example of GitHub.
Let’s go to the «Repository» tab of the required project. There we open the block “Connect GitHub, GitLab, Bitbucket”, immediately copy the URL and select:
Git service - in our case this is GitHub
An event in which the Amverum repository will do a git pull. Moreover, if both Push and CI events are selected, the repository will respond to the CI event.
Add a secret, or generate it through the interface - it will be needed when connecting a webhook to GitHub.
If your repository is private, add the value «Token», which is created in the account settings.
Enter the branch of the remote repository. This is necessary if you plan to use two projects - Stag and Prod. The default branch will be
master.
Click the «connect» button and go to the GitHub repository settings, then to the Webhook settings and paste the copied link into the Payload URL field and the secret into the Secret field and select Content-type: application/json.
Enable SSL verification and select «Send me everything».
We apply the changes and now when pushing to the master GitHub branch of the repository, git pull will be performed and the build will start automatically.
Stage/Prod projects
To create Stage/Prod projects, we use linking various branches of a third-party Git service.
Let’s create two projects and attach a webhook to the repository for each of them. To separate it into stage and prod, when linking in the Amverum interface, we indicate the desired branch of the remote repository. For prod - prod in the first project, for stage, respectively, stage in the second project. There is no need to create branches in your GitHub repository settings.
Now we can push changes with the following command:
git push origin master:<branch-name>
For example like this:
git push github master:prod
And git pull will only be executed on the required project.
Adding Environment Variables
Very often projects require the use of environment variables, as it is convenient and safe.
Important: When building, environment variables specified through the interface are not available.
Go to the «Variables» tab of the project. There you can create a secret (a variable whose value cannot be seen through the interface) and a regular variable.
For example, let’s create one secret containing a token and a regular variable with a name.
Variables are accessed through code. For example, in Python you can access the TOKEN variable like this:
import os

os.getenv("TOKEN")
Variables from the .env file will also be pulled up.
Connecting projects by internal domain name
All projects deployed in Amverum can be linked by an internal domain name and port 80.
For example, if we want to connect to PostgreSQL deployed in Amverum, we need to enter the internal domain name from the domain name block of the “Settings” tab of the project as the host value.
Pre-deployment preparation for each project
Write a YAML file or Dockerfile. For yaml we have a generator that supports a limited set of environments; in other cases it is recommended to use Dockerfile.
Create a file with dependencies requirements.txt (for python projects)
Link the repository to Amverum
Make a push to master
Creating a YAML file (using the example for Python, the process may differ for other languages)
Details on how to manually create a configuration file are described in documentation.
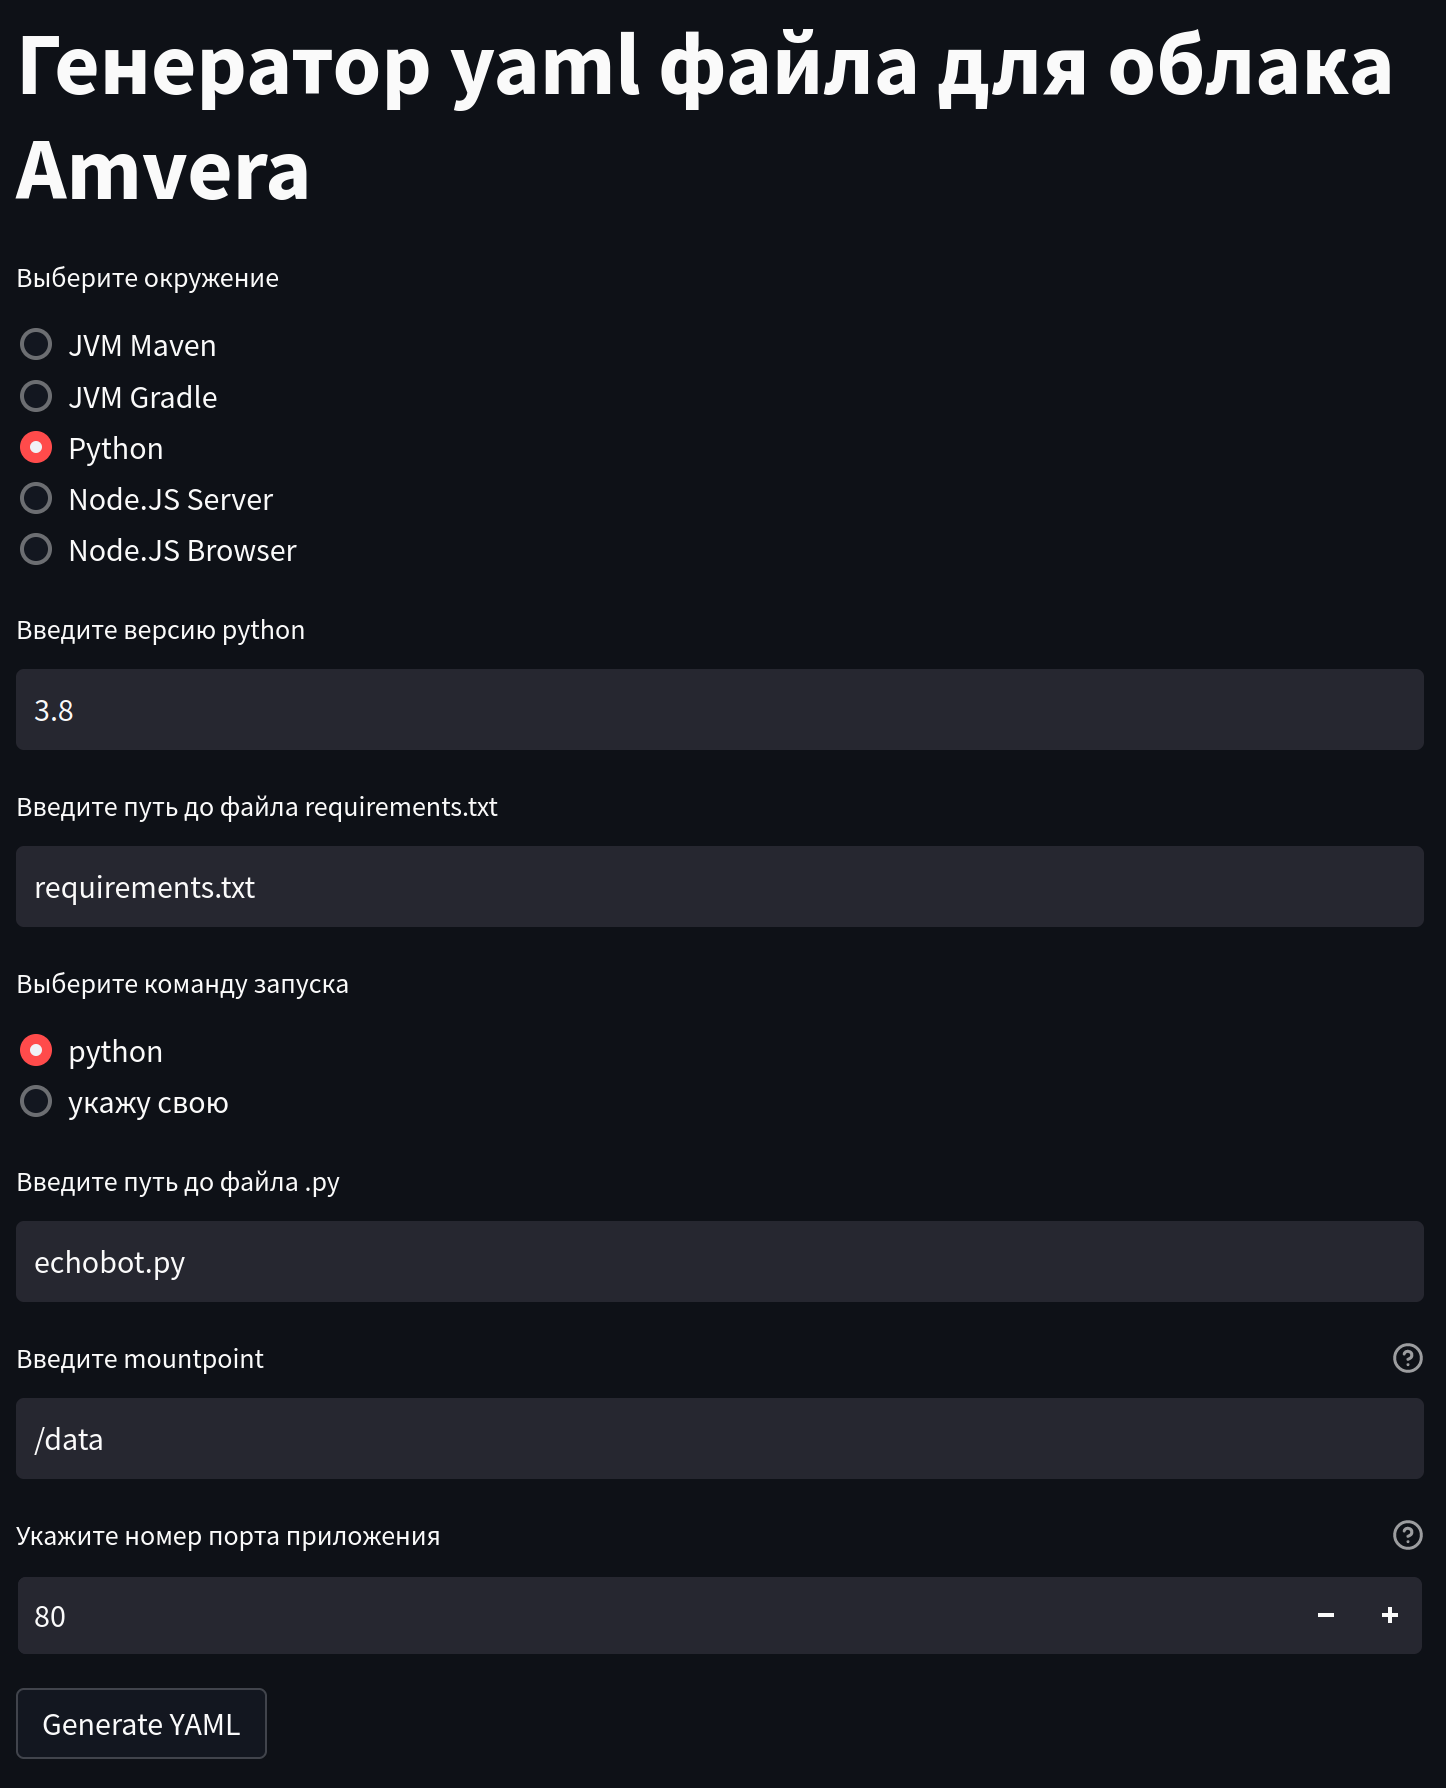
Select the Python environment and version.
Specify the version and path to the requirements.txt file. It is very important to indicate all the packages used in the project in this file so that the cloud can download them via pip.
We indicate the path to the file containing the entry point to the program (the file that you specify to the Python interpreter when you launch the application).
If during operation your bot collects some data from the user that should be saved to disk, then it should be placed in the /data folder. Otherwise, when you restart the project, all data will be lost!
You can specify any port, since in our case it does not play any role (but in most cases we recommend using port 80, it is the one that is open in Amverum).
Click on the Generate YAML button, after which the amverum.yml file begins downloading.
We put the downloaded file in the root of our project.
Creating a dependency file (applicable for Python projects)
Create a file
requirements.txt, in which write the line:python-telegram-botAttention
Your project may have other dependencies that differ from the dependencies in this example - they all need to be registered correctly.
Clue
When deploying telegram bots, a common mistake is the incorrect name of «telebot» in requirements.txt. Telebot in requirements.txt should be named pyTelegramBotAPI, not telebot.
Call
pip install -r requirements.txtto install this package. Why not just install the package viapip install python-telegram-bot? This is also possible, but the requirements.txt file will still be needed for deployment in the cloud, so it’s better to create it right away.You can check that everything is working by running the bot locally via python3 echobot.py and testing the created bot in Telegram (a link to the bot can be found at BotFather).
Place your
requirements.txtat the root of the repository.
Linking a git repository and pushing to master
Three options are possible:
Link to an existing repository (folder).
Initialize the git repository. How to install git if it is not already installed is described here.
In the root of our project we give the command:
git init(if git is already initialized in your project, then this is not necessary)We link our local Git repository to the remote repository using the command indicated on the project page in amverum:
git remote add amverum https://git.amverum.ru/<username>/<transliterated projectname>`
We check that all changes are committed by calling
git status. If there is a list of files there, then you need to commit them by running:git add . git commit -m "Some informative msg"
Submitting changes to the Amverum repository
git push amverum master
When prompted for a user and password, provide your Amverum account user name and password.
Use a dedicated Amverum repository (rather than linking your own).
Clone an empty repository:
git clone https://git.amverum.ru/<username>/<transliterated projectname>
We check that all changes are committed by calling
git status. If there is a list of files there, then you need to commit them by running:git add . git commit -m "Some informative msg"
Submitting changes to the Amverum repository
git push amverum master
When prompted for a user and password, provide your Amverum account user name and password.
Linking GitHub/GitLab as shown above in the instructions
Application Deployment
After the project is pushed into the system, build will begin and on the project page the status will change to «Building in progress».
As soon as the project is assembled, it will move to the launch stage and the status will change to “Deployment in progress”, and then move to “Successfully deployed”.
If for some reason the project does not deploy, you can refer to the build logs and application logs for debugging (they may be delayed by 5-10 minutes). If the Project is stuck in the «Building» status for a long time, and the build logs are not displayed, then it is worth checking again the correctness of the amverum.yaml file and requirements.txt (only in the case of Python) file.
Clue
If logs are written in print, to display them you need to set the PYTHONUNBUFFERED environment variable to 1.
Important
Save database files and other changeable data to permanent storage to avoid losing them when updating the project when the code folder is “rolled back” to the state of the repository update. The data folder in the project root and the /data directory are different directories.
You can check that the save is going to /data by going to the “data” folder on the “Repository” page.
Important
To avoid the 502 error, change host 127.0.0.1 (or similar localhost) to 0.0.0.0 in your code, and specify in the configuration the port that your application listens to (example - 8080).
If you are unable to deploy the project
Write the symptoms you observe to support@amverum.ru indicating your username and project name, we will try to help you.